Tuesday, December 27, 2011

A Beefy Base - TWW Roubo Build Part 6

Welcome back for the sixth installment of my build for The Woodwhisperer Guild Roubo bench build.  Upfront, I apologize for not capturing and subsequently glossing over some of this process. I'm still not great at remembering to always document.  I get caught up in the process and totally forget.

The first up was laying out the mortises for the top to land on to the base.  Again, the Sketch Up model that Aaron Marshall did for Guild was open and constantly referenced.  Using Aaron's model has convinced me that Sketch Up is a must for me to learn.  Any questions I've had during this build have been easy to answer by referencing the exploded views.  I am always tailoring some of the measurements due to my bench being both 10 feet long and only having a 3 inch laminate top.  

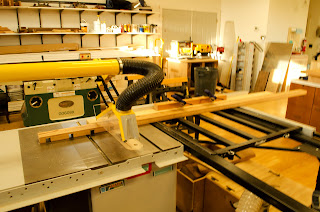
I had been planning on routing the mortises, but wasn't really looking forward to it because of all the dust it would be creating.  More on dust later.  Through discussion on Twitter and an earlier recommendation by Rob Bois of The Bois Shop (A VERY excellent podcaster), I decided to buy the Triton 2 1/4 HP plunge router.  While, according to all the input, the Triton did not have the 5 star rating of the Festool routers, it did have really good dust collection and at a much lower price point.  Luckily, Milne Power Tools, which is conveniently right across the street from my office, carries the Triton brand.  When I got the router home, I made a few modifications with foam tape to help the dust collection to be a bit more effective and set up what I like to call my white trash boom arm.  
This allowed me to route without dealing with the weight of the vacuum hose, which I fed over the top of the only interior wall and suspended with a rope.  If I had only had some baling wire!
Once the mortises were cut, I set up the Excalibur sliding table with the miter fence and cut the legs to length and also cut the tenons.  
I'm essentially a lazy person, so I just nibbled the material away rather than deal with changing out my everyday blade with the dado set. It really didn't take up any time and the cheeks cleaned up quickly with my 2 inch chisel.
  
I spent quite a while perfecting the fit of the legs to the top, but I'm finding more and more I actually love hand work.  I can lose all track of time while I'm playing with a sharp blade on wood.  The size of these tenons was a real joy to work with the 2 inch chisel.  The angle is set rather shallow to be a really great paring blade.

Once I was happy with the fit of the legs to the top, I stopped and milled all the stretcher parts.  This is a process that I forgot to document.  I still use, and sure I always will, power tools for any of the processes that would be labor intensive with hand tools.
Since I plan to first assemble the ends, I made sure the legs were dead square and marked the shoulders of the tenons.  I then laid out the mortise on the legs that will house the stretchers.  Again, I extensively used Aaron's Sketch Up model.  
The next part, which I know some are interested in, was again missed in photo documentation.  The Woodrat, a machine that I really love, is also a machine I really hate. I have not come up with a good solution for dust collection while using it.  I couldn't cut the tenons with the Triton because they were too deep for the Triton plunge capacity.  The Woodrat really excels at rather quickly cutting mortises, although I don't have mine set up to easily handle this size of timber.  You can get a pretty good overview of what the Woodrat is capable of on the Woodrat Site.  I don't remember the name of the guy, but before he died, he reviewed tools and showed how to use them in great detail.  He always had some young lady helping him out.  If you remember his name, please post it in the comments.

Tonight I finished up the mortises and will start the stretchers tomorrow.  If there are any processes you have a question about or frankly advise on a better way to do a process, please let me know in the comments.

Thanks again for following the build!

Sunday, December 18, 2011

Whew! Part Five - TWW Guild Roubo Build


This was easily the most intimidating part of TheWoodwhisperer Guild build for me.  I've only cut one dovetail up to this point by hand.   It did not go well.  This time I'm cutting blind dovetails and from reading the BenchCrafted instructions, you either get the fit of this vise correct, or it doesn't work well.  What good is a premium vise if it doesn't work like it should?

So, I laid out my dovetails and put my little Doc Holliday to work.  I tried to employ what Shannon Rogers has taught us at the Hand Tool School and did my best to "split the line".  I don't know if it was because I was cutting horizontally, the learning curve, or I'm just a spaz, but I managed to drift on each dovetail when cutting the right side.  Both were straight and true on the left where I could actually see the line, but the right sides both drifted to the left as I approached the bottom of the tails.

After cutting out the dovetails, I needed to "straighten" them and pare the waste.  I got to use my Knew Concepts fret saw.  I think next time I can get closer to the base, but even though I was probably being overly cautious, it was fun getting there.


Right off the bat, I found I needed to fire up the sharpening station.  My chisels and, as I found, my planes all needed drastic attention.  I had too shallow an angle on my chisels and was damaging the edge trying to chop out the waste.  The station proved to work very well.  Since I still haven't been pleased creating the initial angle on my Delta variable speed grinder, I used the DMT Duo Sharp in the bottom drawer, moved up to the wet stones, then finished on the sandpaper on glass.  Considering I was completely reshaping the blades, I was surprised how little time it took to get them from rough to a polished finish.  Because I tend to be a space cadet, I made sure to write the settings I used on for the Veritas Mark II honing guide.

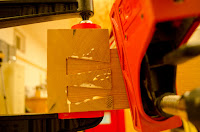
Once I had the tails cleaned up, I created a 1/4" rebate on the bottom of the tails to register against the end cap and transferred the tails to the end cap. 


After rigging up a clamping solution, which I will NEVER have to do again once this bench is built, I again pulled out my Bad Axe dovetail saw and got to work.  It all seemed to go well, but as you can see in the second photo, I was over zealous in marking my lines.  After using the knife to mark, I wanted to define the line a bit better with my chisel and I think I pushed too hard and "moved" the line.

After chiseling out the waste and doing a dry fit, you can see my joint had almost as big of a gap as my front teeth.
With much finessing and dry fitting, Saturday night I glued everything up and called it a day.  I did, however, return to the shop about an hour later to clean up my glue mess.  I'm still not very good at applying just the right amount.


Luckily after clamping up and paring down the end cap, it wasn't nearly as bad as I'd originally suspected.  I've thought about using glue and sawdust to help hide the mistake, but I think this is a good lesson to remember.  The second and bottom is much better than the top and, as time goes on and I keep practicing, I WILL get better.
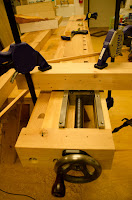
Now came the fitting of the vise.  Because I went with a bench top thickness of 3", the Benchcrafted directions said to use 3/4" thick spacers to properly position the tail vise runners.  That ended up being too thick and made the hardware bind too much to travel as freely as the video shows.  After trying a couple pieces of 3/4" plywood, which is actually 23/32", I thought momentarily about just using it.
Considering the reclaimed aspect of this build, I decided not to introduce man made wood.  It turned out that was a good decision in terms of the vise, too.  I ended up with a even slightly less thickness and the vise's action was incredible.  So, if you are building along or using a Benchcrafted tail vise on a future bench.  Test it out and play with the thickness.

The last thing that was kind of freaking me out was the drilling and final set of the runners.  In the previous post when I'd drilled for the retaining bolts, I had not though about the placement of the runners  I think I dodge that bullet by a hair, which you can see in this photo.


I think the hardest part is over.  I already have the legs, dead man and tail vise parts milled.  I need to mill the rails still and then on to the base construction!!!

Wednesday, December 14, 2011

The Woodwhisper Guild Roubo Build-Part 4


The last two evenings I haven't had any time in the shop, except to clean up a bit.  But, this weekend, which started on Friday, I awoke to a damp and frosty morning.  It was the perfect start to a blissful weekend in the shop.

The first thing I worked on was the finishing touches on the mortise and tenon for the end cap.  This was the second tenon I've cut.  The first was at WIA '11, where I was fortunate enough to have Adam Cherubini give me some one on one instruction on sawing.


For my second tenon and a monster tenon at that, I did pretty darned good with my new Bad Axe Beastmaster and Wyatt Earp saws.  The tenon required very little work to fit just right into the mortise.


The fit was just about perfect.  I left the cap a little proud on both sides to allow me to flush it up after I've got everything together.
Next, I went back and poured over the PDF from Benchcrafted and the Sketch Up plan that  Aaron Marshall has put together for the The Woodwhisperer Guild before I started drilling holes to both attach the end cap to the top and the ones needed for the tail vise.


The Benchcrafted instruction are VERY clear that a perfect fit is essential for flawless operation.


Next up was the part I was dreading the most.  I really hate dust and have tried to design excellent dust collection through out the shop.  The one weak area is any hand held routing operations.  On the next post I'll review the Triton router I bought in response to the mess made when I routed the channel for the tail vise screw.

The initial fit looks very good.  I think it will be dead on!

For the next exercise I got to put my sharpening station to good use.  I drilled the holes for the bolts that attach the cap to the bench and drilled and chiseled out the holes to capture the nuts.
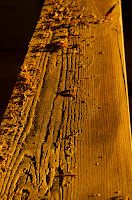
You can see in this photo how hard the winter growth rings are in this Fir.  After talking to Shannon, who is my Hand Tool School teacher, I'm increasing the angle of my bench chisels from 20 degrees to 25 and adding a steeper micro-bevel.

In the midst of all this, I managed to mill up my legs, deadman, and leg vise boards.  I'm going thicker on the legs than in the plan.  Mine are 5 3/8" x 4 1/4".
Hopefully, this weekend I'll finish up the top and move on to the base!

Sunday, December 4, 2011

Split Top Roubo - The Top First

When building a bench, I think most people opt to build the bottom stretcher and leg assembly first.  While that makes sense to me on one level, the sheer mass of the top made me think it would be much easier to tackle it first.  The following is the process I went through from rough to finished (mostly) top.

The first step is assessing what exactly you need to do.  With my very high tech winding sticks, I found the twist and high and lows of each timber.  These winding sticks are made from two pieces of some 1"x4" MDF I have in stock for the house trim.  Both are primer white and I ripped one down slightly and used a Sharpie on the other for contrast.  They're straight and cheap!

Next, I used a long straight edge to level four roller stands on either ends of my jointer.  I'm lucky enough to have an 83 inches in jointer table.  Having the roller stands dead on helped in taking the twist out of the timber.
Normally, if you try to joint a twisted board, you  end up following the twist as move the board across the jointer.  The sheer weight of these actually allowed me to use the weight of the timbers to establish a flat face.  I only had to push and keep the timbers in one position as I moved them across the blades.


Here are the before and after photos of one timber.  They're representative of the majority of the wood.

There are also many "defects" such as this throughout the boards.  Luckily, all the knots are nice and tight still.


Once I had a face flat, I made one of the adjacent faces square to the face.  The next step was to resaw the remaining twist out of the timbers.  I had to move my bandsaw to accommodate a 12 foot operation.
After I had the timbers resawn, I staged and numbered them for the planing operation which which would take them to a uniform size.

I, again, put infeed and outfeed rollers in place for handling these large pieces of wood.
Now that all the timbers were "roughly" finished, I could decide the sequence of boards for the top.  Taking into consideration knots, color, and material size in relation to the final project size.

At this point, I ripped some of the timbers down and then cut them to length.  One of the boards I ripped was then processed at the tablesaw with the Excalibur sliding table and a dado blade to make the square dog hole strip.


This is the glue up.  I used a paint roller and about a 1/4 gallon of glue.  A total of about 14 parallel Jet clamps, 8 Bessey F-clamps, and four cauls to help keep the pieces all lined up.


Here are two shots of the top all glued up and ready for the next step of installing the BenchCrafted tail vise and laying out for the base.


The entire build is going well.  As usual, it's taking me far longer than I anticipated.  Maybe someday, I'll either get faster or better at estimating my time.

Tuesday, November 15, 2011

Cleaning Timbers and an Early Christmas!

I know, it's way too early for talk of Christmas, but people are gearing up and I'm especially filled with holiday cheer.  Santa Claus must think I'm a very good boy, because he's recently sent me two very excellent Christmas gifts.  I've received my Bad Axe saws from Mark Harrell.
Meet Doc, Wyatt and The BeastMaster!  The beautifully handcrafted saws are exquisite.  I had mine made with Cherry handles and stainless steel backs and split nuts.  I can't wait until I get to play with my new little friends!

 And today, my Benchcrafted hardware for my
Roubo bench arrived.  The entire kit includes the leg vise and wagon vise hardware, along with extremely beefy bolts for the the bench stretchers. Those will allow me to adjust for seasonal movement, or if Sylvia ever decides I'm too damn expensive, she can take the bench apart and sell it after she's gotten rid of me.  Remind me to make sure she stays happy!!!

The timbers are almost all cleaned up and I wanted to get you caught up.  I brought over nearly 380 board feet of the reclaimed barn timbers, which is nearly three times the amount actually needed for the build.  The reason for this is that it is a bit rough in places and without being able to see the wood, I really don't know how I am going to choose which timber becomes which piece of the build.


This is a shot of the board I'm cleaning right now.  This is the last board that needed cleaning before I start laying out the pieces and start the rough dimensioning.

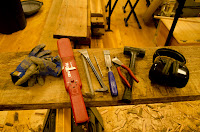
These are the tools I used for the surgical removal of all the errant nails.  Pictured is the Wizard metal detector, gloves and ear muffs, dead blow hammer and chisel, small nail puller, cats paw, side cutters and a dental pick.
I used the Wizard to find the nails and marked each with chalk, then went back over each and used whichever tool suited the situation best to get the metal out of the board.


As you can see I had to excavate to get to the nails that had broken at the surface and rusted inward.


This final shot is how I set up the belt sander to remove the old age, grit and god knows what from the surface prior to subjecting any edge tools to these boards.   The next step is selecting the parts from the oversized pile of lumber and start the rough dimensioning.
I HATE DUST.  As you can see the floor is covered in sawdust and chips from the chiseling, but nothing got airborne.  I've still got to figure out a better solution for my router operations.