Sunday, December 7, 2008

Where did he go?

Hey everyone,

I thought it's about time I explain why the posts have fallen completely off. As you know, I had and still have a large list of things to accomplish here at "the ranch". In addition to that, because of my love for energy efficiency and the environment, I'm part of a group that is in the process of starting a non-profit education network. My job on the board is Secretary and a good portion of my free time is being spent disseminating information to the board and our members as we grow our network. By the way, the name of the network is the Mid Columbia Energy and Environmental Network (MCEEN). I'm thinking this endeavor is going to take the majority of my energies for the next several months, at least. We have a very affluent team to get the organization started. We plan on the network to be a "go to" place for information on all energy and environmental education, both residential and non-residential. Our event planner, Tracy Roberts who owns Tri-City Events, is helping put together a website, forum and blog for MCEEN. When it is up and running, be sure to check it out. It should prove to be a great resource for information.

Thursday, September 25, 2008

Installing Laminate Flooring - A Quick Update

Hello all,

I thought I'd just do a quick post to let you know the floor is coming along. As I said in the last post, it is a bear! Now that Sylvia is home the work is going a little faster. We finished the master bedroom today and will tackle the guest bath and bedroom next weekend. I probably wont get to my office until the following weekend.

As far as the shop is concerned, while I was on vacation, I ordered my dust collection system from Oneida and a 12 inch jointer from Grizzly. I can't wait to get the floor down and address the winter accommodations for the dogs. Time has just flown by and there is no way I'm going to get everything I wanted to accomplish this fall done. Oh well, isn't that always the case? My plan at this point is to finish the flooring, build a set of condos for the dogs inside the garage and then go back and install all the trim in the house. After that, I finally will get to tackle the installation of the dust collection system and start tuning up machines. Once the machines are all tuned, then I get to build cabinets and work stations for the shop. I'm sure glad I like to work!!!

Thursday, September 11, 2008

Installing Laminate Flooring - Slow Start

First of all, Dies ist für meinen besten Freund, meine Ehefrau Sylvia. Ich verpasse Dich! Ich liebe Dich! (Sorry for the, probably, horrible translation baby. I used an on-line translator.)


I have talked to Sylvia daily since she's been in Germany. She says Noah loves his little crane! This flooring is.....a pain in the behind. I've installed Armstrong and Pergo flooring and it was much easier. Of course, it was only 7mm compared with this Rhino floor that is 12mm. I am, although, very happy with the results. I still can't believe we picked this floor. It's labeled as Rustic Oak. If we had just been looking at names, we never would have picked this floor. Neither of us are fans of oak. Personally, I think it's been overdone in American homes. There are some applications that are artistic enough that the wood being oak doesn't bother me. Maybe someday, I'll ask my buddy Ken if he'd mind me giving you all a tour of his home. He has done beautiful work.

Today, I broke into the kitchen and now I have to pull the stove and dishwasher. As you can see I'll also have to backtrack to my office, the guest bath and guest bedroom, which are located off the short hallway you see. Here is the floor thus far.


Sunday, September 7, 2008

Installing Laminate Flooring - Opportunities

I forgot to mention, when you're doing any renovation or upgrade, think about what opportunities the project will afford. For me, this is a great time to seal the registers to the subfloor. My registers are not bad, considering some of the installations I've seen. Some people have good size gaps around their register boots. What happens when there is a gap, whether the register is in the ceiling or the floor, is as the air flows out of the register, it sucks air from the crawl space or the attic into your living space. When the system isn't blowing, it simply allows free movement of convective currents.
To seal, I'm using "duct butter" or mastic. This product is also available in a caulk type tube form. Be very careful to mask off the area around the boots if you don't want it ruined by the mastic. This stuff will not come off!!!


I'll also be on the look out for gaps around piping as I continue this job.

Saturday, September 6, 2008

Installing a Laminate Floor - Prep Work

Due to the unexpected, instead of being in Germany now, I'm at home. Sylvia flew to her home town of Untebalbach on Thursday and should be calling me to help her put Noah's toy back together Sunday.

Hopefully, she'll get some photos and hopefully, he'll like the crane. Instead of fretting about not getting to go and see everyone, drink great beer and eat the best meats, cheeses and breads I've ever had, I thought "why not take advantage of the time I already took from work and get some bigger projects done for the house". While I miss Sylvia a bunch, because she really is my best friend, it's amazing how much more I get done when she's gone!

When we bought our house and moved it onto our land (it's a manufactured house), we knew we were going to be living on a huge sand dune for awhile, so we got th
e cheapest carpet they offered. Between me and the dogs, we managed to track in copious amounts of sand and killed the carpet fibers in no time flat. So, about two months ago we started shopping for new flooring material. Carpet was out due to Sylvia's severe allergies (she can't wait for this carpet to be gone). Also, we have dogs, so hardwood was out. Bamboo almost looked like a decent choice but when you take a nail to it, it scratches too. In addition to standing up to our dogs (two of which will still spin-out like the cartoons), we wanted something that wouldn't show hair. After searching and searching, we finally found a laminate we both liked and would fulfill our requirements. About two weeks ago, my buddy Ken and I went and picked up the shipment and staged it in the garage.


Today, I started moving furniture, removing trim, and pulling the carpet. You can see in this photo all the sand/dirt that made it's way through the carpet and carpet pad to the subfloor. It happens to be at the entrance to the kitchen and the dogs favorite place when we (o.k., mostly Sylvia) are cooking. It's a good idea to photograph bookcases so you can remember how they were meticulously arranged.

A scraper is handy to remove all the caulking left after you pull the trim.

Hopefully tomorrow, I'll start laying down some flooring. I've done several floating floors, but never a whole house at once. Plus, the sales guys said that because this flooring is so thick (12 mm), it's a bear. Wish me luck!


Monday, September 1, 2008

A Toy for Noah - The Unveiling

Today, I finally finished up the little buggers toy crane. Over the weekend I set up a makeshift spray booth and shot it with lacquer.
And here is Noah's crane all ready to go.


I made a lot of mistakes on this project. Luckily none will show. Now I have to take the whole thing apart, so it'll fit into a suitcase. Even though this was only a toy, it presented this newbie quite a few new procedures. Hopefully, I'll get to Bisket's serving stand as soon as I get back.

Fall is just around the corner and with it comes a great deal of work. I need to insulate the garage for the dogs to hang out in during the day. Sylvia wanted to pull all the carpet, so I have a complete house worth of laminate to install, and then there is all the regular fall clean up before winter sets in. Hopefully, after that I can start making cabinets for the shop and get that puppy up and ready for whatever I end up planning.

Tuesday, August 26, 2008

A Toy for Noah - Part Deux

I have to say that I'm totally embarrassed that this has taken so much time. Who'da thunk a toy would have so many steps for a building process! Actually, it has been fun to finally play with some of my big boy toys. I've had the opportunity to resaw on my new bandsaw. I wish it were the new one unveiled by Powermatic at this years IWF, but alas, I have what I have and it does a nice job.

I've played with my Rigid sander, my radial arm drill press, set my makeshift router table up, and got to do a stain job.
The plan called for two different contrasting woods. Wood magazine used maple and walnut. I priced the walnut and decided that staining my birch would do. I figure when I go to replace the birch slabs I used, this is still using at least $70 dollars worth of lumber, and that's not counting the kit. I got all the parts milled. Cut everything to size, did the glue-ups, beveled all the appropriate edges and finished sanded all the parts. I'm almost ready to start the finish. My plan is to dilute a polyurethane to make a wipe on finish.
I figure 4 coats would be Noah proof. I sure hope he's still young enough to enjoy this gift. If not, his brand new baby brother, Luca Fin (Sylvia likes to always put his first and middle names together) will enjoy it when he gets a bit older.
Due to all we have to do to get ready for Germany, I don't think I'm gonna be able to get back to Bisket's Serving Stand until we get back.

On a positive note, I did get a new "toy" today. I picked up a DYS4500 Craftsman (that's right Mr. LQQK, Craftsman) lawn tractor today. I know what you're thinking. That's got nothing to do with the shop! Well, yes it does. Before this, mowing our yard took over three hours. It's crazy! We live in a desert and have over an acre of yard! I'm pretty sure I'm goin' to hell for that! But honest, it wasn't all my idea. A friend, who is a firefighter said that, because of how our property is situated, we needed at least 30 feet of green space around all structures. I've got a 1000 gallon propane tank that wouldn't like to get too hot! Luckily the fire department is right down the road and know we have a potential bomb. It makes our property a high priority, in the event of a fire. The mower will enable me to have more shop time. So, I'm trying not to feel too bad that it took money away from the shop.

Saturday, August 23, 2008

The Green Shop - Trusses and Heating Systems


So you've figured out how you're going to build the shop. If you're like me, you decided to do it yourself and probably went with traditional (in the U.S.) stick framing. Hopefully, you will choose a better alternative than fiberglass batt insulation. If not, remember to go crazy with the caulk and foam, and be extremely anal in doing a "perfect" installation of the batts.

Now for the truss system. This one is easy. It's gonna cost a little extra, but go with what is called a raised heel or energy truss. If you use a traditional truss, you do have a way to do a "better" job of getting the insulation all the way to the edge of the eave, but it will cost more than if you had originally purchased the energy truss. Three years ago, when I started my shop, I didn't know about energy trusses and therefore took the more expensive route. When it came time to spray the foam in my wall cavities, I hung the sheet rock on the ceiling at the eaves and had them also spray eighteen inch in. That is the approximate distance in from the eave I had to go before I could get an R49 (15 inches) of blown in cellulose.

If you opted to build on a slab and plan on a traditional (again, only in the U.S.) heating and cooling system. Think seriously about a conditioned attic. The idea is very similar to what I discussed in "Slab or Crawl Space". You would place the insulation against the roof, not the ceiling and you will not be installing vents. See "Slab or Crawl Space" also for how heat moves.

I installed a traditional HVAC system. I've since learned about ductless heat pumps and plan on installing a multi-split system in my house. I currently heat with propane and, like all fossil fuels, the cost has been rising dramatically and I believe will continue to only go up in price. The system I'm planning on installing will pay for itself in less than five years. That is my house. My shop is another story. Because it is so energy efficient, I'll be holding off until the price of propane goes up another $2.00 or more. In both cases I will be keeping my existing units in place as back up. While these ductless heat pumps are very efficient, they do have a threshold for how cold the air can be and still be able to have heat extracted.

If I was building my shop today, I would install a single or double unit ductless heat pump and have, as back up, a couple electric resistance wall units or a few portable units. We rarely get very much below zero and don't stay there for long.

I hope The Green Shop posts have been helpful to those of you who are building, or have built, a shop. If you are planning on building a house, most of what I've written about also applies. Get your contractors and sub-contractors involved, and on board early on, if you plan on building a highly efficient green house. Again, if you have any questions, feel free to ask. If I don't know, I know people who do. Also, make sure to check with your local utility to see if they offer free, or low cost, household inspections. There are a few very lost cost measures anyone can do to their house and get a good return on the investment.

P.S. For photos of my shop, check out the Flickr widget in the right hand column.

Sunday, August 17, 2008

A Toy for Noah

Very soon Sylvia and I are headed to Germany. Last month, or so, Sylvia was breezing through my WOOD magazine and saw one of the many cheezy projects they feature. This one happened to be a wooden toy crane. Sylvia's Dad was a crane operator for a good portion of his career (he helped build the Porsche plant in Stuttgart). So, I was asked to build this for our nephew Noah. It's not what I would consider woodworking, but what can I do? I adore my wife and love the little devil known as Noah. If any of you have ever checked one of these toys out, you know it's a little woodworking and mostly assembling a kit. Come to think of it, it may be a good thing to get my tools awake.

I have not forgotten about Bisket's stand. Hopefully, I'll have time to finish that before we head to Germany. The last few weeks I have been focusing on getting the shop a little more functional. When I started Bisket's project, I soon started freaking out because the shop was sooooo disorganized. Since I'm not gonna be building any cabinets in the very near future, I put some exterior doors on some sawhorses and that has helped. I still have a lot to organize, but at least I can somewhat function in the space now. I spent the majority of this morning getting Ken's jointer all ready for work.

On Thursday, Ken and I went to the warehouse and got a few slabs of birch. I looked at some wood that a local place sells and was appalled at the price. Even though this project uses hard maple and walnut in the magazine. Birch will have to do. I really hate sacrificing these for a toy, but again, what can I do?
The really nice thing about this is being able to use my new bandsaw for the first time. LOVED that!! I spent a few hours laying out the pieces I'll need and doing some rough dimensioning. Here's where I am so far.
My buddy Ken said this is called "Canoe Birch", due to the fact the Native Indians in our area used the bark of this particular birch to make canoes. I think it also has more color than other birch wood I've seen.

Saturday, August 16, 2008

The Green Shop - Choosing a Building Method for Walls

I've been hearing a lot of people talk about how hot and uncomfortable their shops are now that it is summer. My goal when building my shop, was not only to have a comfortable space to do woodwork, but also, to not have my shop greatly increase our energy costs.
If comfort, or energy costs for comfort, are a high a priority for you in your shop, then what I'm talking about in this thread is really going to be a benefit to you. My goal with this thread is to help you make the best decisions on how to achieve the most comfort with the least overall costs.

Sometimes a little more cost upfront will have a huge impact in the future cost of the building. My favorite building method is a case in point. SIPS: Structural Insulated Panel Systems are by far my favorite system because they, can be made completely from recycled material,create an airtight envelope, and completely eliminate thermal bridging. SIPS are made by sandwiching polystyrene (similar to the kind used for ice chests) in between two sheets of OSB (Oriented Strand Board). However, they require a contractor that has knowledge in SIPS construction and, where I live, there aren't any contractors using them.

My second choice for a building system uses ICFs (Insulated Concrete Forms). These are foam blocks that go together like Legos and have a concrete infill. These also provide an airtight envelope and eliminate thermal bridging but, due to the high energy process of making concrete, are not nearly as "green" an option. Plus, if the footing and foundation is not done in such a way that it breaks the thermal coupling with the ground, that large mass of concrete can cost you heating dollars instead of saving them. However, you'll find it much easier to find a contractor who uses this building method.

Since I was building my shop myself, I went with traditional "stick framing". The unfortunate byproduct of this building method is thermal bridging. Thermal bridging lets heat in and out of the building via conduction. In this instance, you'll have a wall stud in direct contact with both the interior and exterior sheathing. You can lessen the amount of thermal bridging by using what is known as "advanced framing", which is basically using less studs. Instead of building with the now typical 16 inches on center, you would go 24 inches on center. This not only decreases thermal bridging, but also increases how much insulation you can install. If you're going to build yourself, either take a class on "advanced framing" or make sure your plans are engineered and drawn up with "advanced framing" details.

Going the framing route means you'll also have to decide what type of insulation you're going to use. I used a closed cell polyurethane spray foam. This created an air tight seal and high insulating value. It is one of the things I had to contract out, due to the specialized equipment needed. A do-it-yourself option is batt insulation. This will work, but requires extreme attention to detailed installation. A small compression, not having the insulation touch all surfaces, or any gap will make this type of insulation perform very poorly. I would also advise caulking everywhere two different members contact each other and all holes in electrical boxes (including unused knock-outs). Anywhere there is any type of penetration needs to either be caulked or foamed, if the hole is too large to caulk.

Again, even though I'm writing about the building process in a linear form, many of the subjects need to be discussed at the beginning. If you're using a contractor, architect, or engineer make sure they are viewing the building process as a whole, not individual parts. All the details need to be worked out prior to breaking ground for best results.

Friday, August 1, 2008

The Green Shop - Planning ( Slab or Crawl)

Let's go back a minute to the question of slab vs. crawl space. I'm going to get into what is known in my profession as "lost opportunities". If you're going with a slab floor, your "lost opportunity" is getting it insulated correctly, because you can never go back and install it later. In the past the practice has been to make a bed, normally crushed rock, compacted with a vibrator. You might have a contractor that will waterproof the foundation below grade and maybe even install extruded poly-type foam down the side of the foundation walls. I would urge you to also install "blue board", which has an R - value of about 5 per inch under the entire slab. Use at least two inches. This is done to break the thermal coupling between the slab and the ground.

Now would be a good place to explain the three different ways heat travels from hot to cold. I know you've always been taught that heat rises. Hot air rises, heat moves to cold. It does so by conduction, convection and radiation. Conduction is how heat travels when object are in contact with one another. Convective heat transfer is through air movement (hot air rises and displaces cold air, which then has to move down). This is what causes tornadoes. So, you can see that it is a very powerful force. The last is, of course, radiation. Everyone has experienced the warmth from the sun. That is the heat of the sun (a very hot object) moving toward our planet and us (much cooler objects), which then absorb the radiation and become heated.

By creating a thermal break between the concrete and the ground, you will enable the concrete to better stabilize at the temperature you want to keep the shop, say 75 degrees. If you do not break the thermal coupling, the concrete will alway try to reach equilibrium with the temperature of the ground, which in my area is about 55 degrees. That cooled concrete would then radiate into the shop and cause you to use more energy to keep it up to 75 degrees, than had you installed insulation.

Now if you are choosing a crawl space, some of the same rules apply. There are new ideas about how to treat a crawl space. Since (if I remember correctly) the 1940s, building officials and contractors have been required to vent crawl spaces. The homeowner was to close the vents in the winter to prevent pipes from freezing and help stop heat loss through the floors, then open the vents in the summer to "dry out" the space. Time has shown this methodology to be completely flawed.
Especially in the humid areas of the U.S., opening the vents when the heating season was over has let warm, moist air get into our crawl spaces, creating mold problems and wood rot. Search "conditioned crawl spaces" and you can turn up way too many web pages on the subject. Just be sure to do your homework on the subject. Many of those pages are posted by someone wanting to sell you something. For information, stick to those that are for information only. Here are a few sites. Building Science.com, U.S. DOE, Pacific NW Labs & Advanced Energy.

Now, I live in a desert and moisture just isn't ever a problem. The reason for a conditioned crawlspace here is specifically to help prevent heat loss. Usually if you have heat, air conditioning, and a crawl, your duct work is run in the crawl space. Even if you insulate your duct work, a conditioned crawl space makes sense. The heat inside your ducts usually is anywhere between 87 to 105 degrees, in the heating season. If you condition your crawl space, the winter temperatures (with out heating the crawl) will be around 55 to 60 degrees. If the crawl isn't conditioned that can fall to the forties or below, even with the vents closed. The bigger difference between the temperature inside the ducts and the temperature outside, the more force behind the movement of heat.

I think this post is long enough. Let me know if I'm giving too much information or if you'd like me to cover other specific subjects, instead of the whole process of building a energy efficient shop. My next Green Shop post will cover the envelope.

Friday, July 25, 2008

The Green Shop - Planning (Part One)

When we decided to sell our old 1910 Craftsman house, the deal was that Sylvia got a pool and I got to have a "real" shop. Even though I had grown up with a pool and spent more time doing pool care than actually swimming, my workshop was a small two car garage with 7 foot ceilings and I was game for whatever I had to do to get into a space where I could move wood around instead of tools.
As far as building went, I had helped my best friend over the years whenever he needed an extra body on a construction job. So, I knew my way around a construction site, but I was not experienced or fast enough to ever lead a crew.

When it came time to design a shop, I had an engineer draw up plans for me and just got the project started. Now that I'm in the energy consulting field and learning from the very best, I would have done things much differently.

Whether the shop you want is attached to a house or stands alone, there are some very critical decisions that need to be worked out at the design phase. What type of structure do you want to build? Do you want to work on a concrete slab or wood floor? Do you have an option to position the structure for solar gain? What, if any, plumbing would you like in the shop? Do you plan on heating and air conditioning the environment? These questions along with many other questions dealing with code, electrical requirements and load (weight) requirements need to be answered before the plans to the shop are even started.

So let's start with one of the questions. Concrete slab or wood floor? If you can orient the structure for good winter solar gain, a concrete slab will be a big heating benefit. For me, I wanted to have a crawl space, so I could avoid electrical cords and dust collection pipes being a tripping hazard or just in the way of moving lumber or sheet goods around the shop. Plus, I don't care much for standing for long periods on hard surfaces. It is at this stage in the design you'll need to decide where you want plumbing and what type of HVAC (Heating, Ventilation, Air Conditioning) you'd like to use.

On my next building post, I'll discuss the envelope, scheduled plumbing, and HVAC options. Also, as I stated before, I'm not writing a book and therefore am not going to get into all the details. If you have a specific inquiry, please comment or email me.

Tuesday, July 22, 2008

My First Dovetail

There are a lot of firsts in life. Your first step, first kiss, first time making love. To be honest, I'd like to forget all my firsts, because I pretty much sucked. But, you deserve full disclosure on my woodworking abilities, or, more accurately, inabilities. So, here is my first dovetail joint. I know, pretty sad. But, believe me, not as sad as some of my other firsts. Thankfully, if you are willing to practice, you will generally get better. I give you my second attempt at the dovetail joint. While it is no where near what I could be proud of, it is better than my first attempt. I hope those of you who are just starting out, will be inspired to know you are not the only person in the world that sucks at this. Everyone had to start somewhere and like all my other firsts, everything that followed has gotten better. I usually walk pretty well now, at least when I'm sober.

Sunday, July 20, 2008

The Green Shop

As many of you know, I've just finished building my shop. It had been three years, in April, since I started the process. Now, I've always been somewhat of a "green" nut, but about two years ago I started getting education for the field of energy efficiency. As far as a job goes, I've hit the lottery. I get to help people become energy efficient, or at least educate people on cost effective efficiency measures they can implement in the residential, commercial, industrial and agricultural sectors.

What does this have to do with my shop? Well, as I said, I started getting educated about two years ago. The shop building started
three years ago. I missed the opportunity to make better decisions at the beginning of my shop build. As I make the "Shop Building Posts", hopefully, those that are contemplating building a shop will learn from my mistakes and from what has been successful in the building of my shop. I'll try to make the posts in the order of the building decisions you'll have to make. Also, because I'm posting and not writing a book, I won't be going into great detail. If you are building or having problems with the bills or comfort of your existing shop, and would like some advice, feel free to contact me by email or leave your questions in the comments field.


Thursday, July 17, 2008

A Rare Opportunity


I wanted to let all of you who are interested in design know, there is a rare opportunity to view an interview with Wendell Castle. Neil Lamens of Furnitology can barely contain himself as he has the opportunity to have a private chat with one of the great designers of this century. Check it out!

Monday, July 14, 2008

Serving Bisket - Top and Bottom

I'm behind on my little project due to being "forced to spend a day by the pool, BBQing and drinking beers with a few friends?" Well, at least it was fun and I got to eat my two favorite foods, Pork and Bacon. YUM!!! Throw a piece of ham on that and I'd be in heaven! I BBQ'd pork tenderloins, wrapped in bacon and rubbed with roasted and ground fennel seed, salt and pepper. I don't know if I've covered the fact that Sylvia has decided that nothing needs to die for her subsistence. While I agree with her feelings on the subject, I told her I'd like to get through the summer before I go completely vegetarian. At least she can still eat eggs. The new diet hasn't completely killed me because Sylvia is an awesome cook who could probably make brussel sprouts taste OK.

Anyway, I managed to get a little shop time in tonight and got the top panel that I'd re-glued, re-sanded. I cut both the top and bottom to final dimension and tomorrow will hopefully have time to get in and figure out the dimensions for the legs and start getting them rough cut.
Also, on a tangent, be nice to others. Yesterday, someone attacked a friend's blog with some really just plain, nasty comments. It was clear the guy had some weird agenda, probably because my friend has worked hard and made a very, very successful blog (http://thewoodwhisperer.com).
Anyway, like I said, be nice. Life is WAAAY too short to spend any of it being someone that you wouldn't even like.

Sunday, July 13, 2008

A Bit of History

The following is put forth to give a little insight to who I am and what sparked my desire to build a shop and try to take on woodworking. I love to make something out of nothing. I have no idea whether I'll be any good. I only know I really want to be. Sylvia and I bought the following house when we first started"shacking up". It took us over eight years to complete. Along the way, we bought five acres in the country. One night Sylvia had a dream, basically telling her we needed to move. Since her Mom's side of the family have all been somewhat precognitive, we pulled the old house together, sold it, and have been developing our place in the country ever since. So, after more than 13 years, my shop is almost complete and I get to start living my dream.The following is from an email I wrote to Kari (The Village Carpenter) because Sylvia and I had seen a picture of Nancy's garden and were blown away at how much it looked like Sylvia's original garden.

If you don't already know who Kari is, you owe it to yourself to check her out. Not only is she a woman in a typically male field,she's damn good and has lovely nails.

_____________________________________________________________________

OK! First, Notice the lovely wall colors! There were also nasty acoustic tiles on the ceiling. We are in the dining room looking into the living room. That "thing" in the corner was the only downstairs heat. There was also a "window banger" in the living room for A/C. We later installed a central HVAC, which if you'd like a bizarre story, I'd be willing to share.

This, quite a few years later is the front of the house (after the backyard fence and automatic sprinklers were installed).
Ooh! Here we have the mudroom. Later you'll see the outside of this addition. Notice they actually built on to the back of the house...It actually is a converted porch, sloped and everything.
Early people of this land had a thing for doors! This is the "during" shot of the kitchen. There are actually four...FOUR! doors in the kitchen. The left door was taken out (it goes to the foyer) and the right door leads to the "root cellar", which was originally where the coal was deposited.

Here is the before of the kitchen. Again, notice the acoustic tile..and what a beautiful floor! And ew, it was nasty, gross, dirty!
The west side of the house shortly after we'd bought it. Notice the window by the tree in the shed addition. Yes, that's plywood. They boarded it up and put a shower stall over it.

That's right get mad at the wall..not at me! I had said..."oh, a little paint and it'll be sweet!" We first tried to preserve the plaster walls and redo the woodwork in place...

OK..really out of order..pay no attention to this yet..(Sylvia filling in two of the raised beds I built her) The other garden you'll see came first.


Well..what do ya know! There it is! Look familiar??????

The living room after the remodel. We put a nicer acoustic tile on the ceiling (all the seams were caulked and it ended up looking like a really nice tin stamped design.)I did most of the ceiling and crown molding while Sylvia was home in Germany. She thought the big crown molding would be to gaudy. She changed her mind when she saw it in place.

The dining room..a basic mirror image of the living room. I miss the wood trim and the nine inch mop boards.

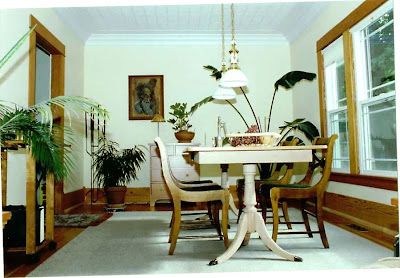
This bathroom was GGGGRRRROSS!!! The old couple that lived here (son of the builder and his wife) hadn't been upstairs in about five years. Evidently before he'd moved downstairs, he'd lost his ability to aim...

Again, out of order. The kitchen after. You are looking directly at where the door to the foyer used to be. The floors were not salvagable (spell check says that's not a "real" word") Well...screw spell check. Notice the soffit is directly in line with the edge of the cabinets. Things go like this in our house..Sylvia: "I want the box on top to line up with the bottom." Vic: "But, that's not hows it's done." Sylvia: "Well, can you do it?"Vic (begrudgingly):"I don't know, I'll try." (See that's the reason she keeps me around, I have no idea that I really can't do stuff!!)
Ta Da..go back to the nasty picture of the bathroom. .....Much better...no more nasty urine smell either....BONUS!
Well Kari and Nancy, I hope you've enjoyed this trip down memory lane with me. Designs by Vic and Sylvia...mostly Sylvia...it's really her house...even in the new one.

Thursday, July 10, 2008

Serving Bisket - OOPS! & Changes

Well, I got the top and bottom of the serving stand glued up. That was one step forward. When I ran them through my drum sander, the bottom looked good


but
the top, mmmmm not so good. I didn't pencil on a triangle to keep my boards organized and I got my heartwood stuck between my sapwood.


Or did I get my sapwood stuck between my heartwood. Either way, I doubt it tastes much like peanut butter and chocolate. So, one step back and re-saw and re-glue the top.

The rest of the night I spent trying to figure out the edge detail. Since I am still limited on the selection of tools to choose from and I really wanted a curve that I can't get with a router (at least that I know
of), I decided the tablesaw was probably my best bet. This first profile just seems too much of an ogee to have the Asian feel I'm going for.

I tried a few different configuration of the angle of the temporary fence and the angle of the blade, but nothing felt good. So, back to the sketch book. I think this design has a better Asian flair and is much more doable with the on the tablesaw.


We'll see.