skip to main |
skip to sidebar
I have to say that I'm totally embarrassed that this has taken so much time. Who'da thunk a toy would have so many steps for a building process! Actually, it has been fun to finally play with some of my big boy toys. I've had the opportunity to resaw on my new bandsaw. I wish it were the new one unveiled by Powermatic at this years IWF, but alas, I have what I have and it does a nice job.
I've played with my Rigid sander, my radial arm drill press, set my makeshift router table up, and got to do a stain job. The plan called for two different contrasting woods. Wood magazine used maple and walnut. I priced the walnut and decided that staining my birch would do. I figure when I go to replace the birch slabs I used, this is still using at least $70 dollars worth of lumber, and that's not counting the kit. I got all the parts milled.
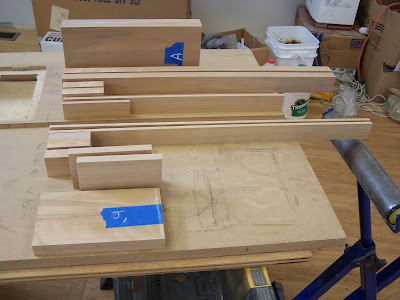 Cut everything to size, did the glue-ups, beveled all the appropriate edges and finished sanded all the parts. I'm almost ready to start the finish.
  My plan is to dilute a polyurethane to make a wipe on finish.
I figure 4 coats would be Noah proof. I sure hope he's still young enough to enjoy this gift. If not, his brand new baby brother, Luca Fin (Sylvia likes to always put his first and middle names together) will enjoy it when he gets a bit older.
Due to all we have to do to get ready for Germany, I don't think I'm gonna be able to get back to Bisket's Serving Stand until we get back.
On a positive note, I did get a new "toy" today. I picked up a DYS4500 Craftsman (that's right Mr. LQQK, Craftsman) lawn tractor today. I know what you're thinking. That's got nothing to do with the shop! Well, yes it does. Before this, mowing our yard took over three hours. It's crazy! We live in a desert and have over an acre of yard! I'm pretty sure I'm goin' to hell for that! But honest, it wasn't all my idea. A friend, who is a firefighter said that, because of how our property is situated, we needed at least 30 feet of green space around all structures. I've got a 1000 gallon propane tank that wouldn't like to get too hot! Luckily the fire department is right down the road and know we have a potential bomb. It makes our property a high priority, in the event of a fire. The mower will enable me to have more shop time. So, I'm trying not to feel too bad that it took money away from the shop.
 So you've figured out how you're going to build the shop. If you're like me, you decided to do it yourself and probably went with traditional (in the U.S.) stick framing. Hopefully, you will choose a better alternative than fiberglass batt insulation. If not, remember to go crazy with the caulk and foam, and be extremely anal in doing a "perfect" installation of the batts.
Now for the truss system. This one is easy. It's gonna cost a little extra, but go with what is called a raised heel or energy truss. If you use a traditional truss, you do have a way to do a "better" job of getting the insulation all the way to the edge of the eave, but it will cost more than if you had originally purchased the energy truss. Three years ago, when I started my shop, I didn't know about energy trusses and therefore took the more expensive route. When it came time to spray the foam in my wall cavities, I hung the sheet rock on the ceiling at the eaves and had them also spray eighteen inch in. That is the approximate distance in from the eave I had to go before I could get an R49 (15 inches) of blown in cellulose.
If you opted to build on a slab and plan on a traditional (again, only in the U.S.) heating and cooling system. Think seriously about a conditioned attic. The idea is very similar to what I discussed in "Slab or Crawl Space". You would place the insulation against the roof, not the ceiling and you will not be installing vents. See "Slab or Crawl Space" also for how heat moves.
I installed a traditional HVAC system. I've since learned about ductless heat pumps and plan on installing a multi-split system in my house. I currently heat with propane and, like all fossil fuels, the cost has been rising dramatically and I believe will continue to only go up in price. The system I'm planning on installing will pay for itself in less than five years. That is my house. My shop is another story. Because it is so energy efficient, I'll be holding off until the price of propane goes up another $2.00 or more. In both cases I will be keeping my existing units in place as back up. While these ductless heat pumps are very efficient, they do have a threshold for how cold the air can be and still be able to have heat extracted.
If I was building my shop today, I would install a single or double unit ductless heat pump and have, as back up, a couple electric resistance wall units or a few portable units. We rarely get very much below zero and don't stay there for long.
I hope The Green Shop posts have been helpful to those of you who are building, or have built, a shop. If you are planning on building a house, most of what I've written about also applies. Get your contractors and sub-contractors involved, and on board early on, if you plan on building a highly efficient green house. Again, if you have any questions, feel free to ask. If I don't know, I know people who do. Also, make sure to check with your local utility to see if they offer free, or low cost, household inspections. There are a few very lost cost measures anyone can do to their house and get a good return on the investment.
P.S. For photos of my shop, check out the Flickr widget in the right hand column.
Very soon Sylvia and I are headed to Germany. Last month, or so, Sylvia was breezing through my WOOD magazine and saw one of the many cheezy projects they feature. This one happened to be a wooden toy crane. Sylvia's Dad was a crane operator for a good portion of his career (he helped build the Porsche plant in Stuttgart). So, I was asked to build this for our nephew Noah. It's not what I would consider woodworking, but what can I do? I adore my wife and love the little devil known as Noah.
 If any of you have ever checked one of these toys out, you know it's a little woodworking and mostly assembling a kit. Come to think of it, it may be a good thing to get my tools awake.
I have not forgotten about Bisket's stand. Hopefully, I'll have time to finish that before we head to Germany. The last few weeks I have been focusing on getting the shop a little more functional. When I started Bisket's project, I soon started freaking out because the shop was sooooo disorganized. Since I'm not gonna be building any cabinets in the very near future, I put some exterior doors on some sawhorses and that has helped. I still have a lot to organize, but at least I can somewhat function in the space now. I spent the majority of this morning getting Ken's jointer all ready for work.
On Thursday, Ken and I went to the warehouse and got a few slabs of birch. I looked at some wood that a local place sells and was appalled at the price. Even though this project uses hard maple and walnut in the magazine. Birch will have to do. I really hate sacrificing these for a toy, but again, what can I do?
 The really nice thing about this is being able to use my new bandsaw for the first time. LOVED that!! I spent a few hours laying out the pieces I'll need and doing some rough dimensioning. Here's where I am so far.
 My buddy Ken said this is called "Canoe Birch", due to the fact the Native Indians in our area used the bark of this particular birch to make canoes. I think it also has more color than other birch wood I've seen.
I've been hearing a lot of people talk about how hot and uncomfortable their shops are now that it is summer. My goal when building my shop, was not only to have a comfortable space to do woodwork, but also, to not have my shop greatly increase our energy costs.
If comfort, or energy costs for comfort, are a high a priority for you in your shop, then what I'm talking about in this thread is really going to be a benefit to you. My goal with this thread is to help you make the best decisions on how to achieve the most comfort with the least overall costs.
Sometimes a little more cost upfront will have a huge impact in the future cost of the building. My favorite building method is a case in point. SIPS: Structural Insulated Panel Systems are by far my favorite system because they, can be made completely from recycled material,create an airtight envelope, and completely eliminate thermal bridging. SIPS are made by sandwiching polystyrene (similar to the kind used for ice chests) in between two sheets of OSB (Oriented Strand Board). However, they require a contractor that has knowledge in SIPS construction and, where I live, there aren't any contractors using them.
My second choice for a building system uses ICFs (Insulated Concrete Forms). These are foam blocks that go together like Legos and have a concrete infill. These also provide an airtight envelope and eliminate thermal bridging but, due to the high energy process of making concrete, are not nearly as "green" an option. Plus, if the footing and foundation is not done in such a way that it breaks the thermal coupling with the ground, that large mass of concrete can cost you heating dollars instead of saving them. However, you'll find it much easier to find a contractor who uses this building method.
Since I was building my shop myself, I went with traditional "stick framing". The unfortunate byproduct of this building method is thermal bridging. Thermal bridging lets heat in and out of the building via conduction. In this instance, you'll have a wall stud in direct contact with both the interior and exterior sheathing. You can lessen the amount of thermal bridging by using what is known as "advanced framing", which is basically using less studs. Instead of building with the now typical 16 inches on center, you would go 24 inches on center. This not only decreases thermal bridging, but also increases how much insulation you can install. If you're going to build yourself, either take a class on "advanced framing" or make sure your plans are engineered and drawn up with "advanced framing" details.
Going the framing route means you'll also have to decide what type of insulation you're going to use. I used a closed cell polyurethane spray foam. This created an air tight seal and high insulating value. It is one of the things I had to contract out, due to the specialized equipment needed. A do-it-yourself option is batt insulation. This will work, but requires extreme attention to detailed installation. A small compression, not having the insulation touch all surfaces, or any gap will make this type of insulation perform very poorly. I would also advise caulking everywhere two different members contact each other and all holes in electrical boxes (including unused knock-outs). Anywhere there is any type of penetration needs to either be caulked or foamed, if the hole is too large to caulk.
Again, even though I'm writing about the building process in a linear form, many of the subjects need to be discussed at the beginning. If you're using a contractor, architect, or engineer make sure they are viewing the building process as a whole, not individual parts. All the details need to be worked out prior to breaking ground for best results.
Let's go back a minute to the question of slab vs. crawl space. I'm going to get into what is known in my profession as "lost opportunities". If you're going with a slab floor, your "lost opportunity" is getting it insulated correctly, because you can never go back and install it later. In the past the practice has been to make a bed, normally crushed rock, compacted with a vibrator. You might have a contractor that will waterproof the foundation below grade and maybe even install extruded poly-type foam down the side of the foundation walls. I would urge you to also install "blue board", which has an R - value of about 5 per inch under the entire slab. Use at least two inches. This is done to break the thermal coupling between the slab and the ground.
Now would be a good place to explain the three different ways heat travels from hot to cold. I know you've always been taught that heat rises. Hot air rises, heat moves to cold. It does so by conduction, convection and radiation. Conduction is how heat travels when object are in contact with one another. Convective heat transfer is through air movement (hot air rises and displaces cold air, which then has to move down). This is what causes tornadoes. So, you can see that it is a very powerful force. The last is, of course, radiation. Everyone has experienced the warmth from the sun. That is the heat of the sun (a very hot object) moving toward our planet and us (much cooler objects), which then absorb the radiation and become heated.
By creating a thermal break between the concrete and the ground, you will enable the concrete to better stabilize at the temperature you want to keep the shop, say 75 degrees. If you do not break the thermal coupling, the concrete will alway try to reach equilibrium with the temperature of the ground, which in my area is about 55 degrees. That cooled concrete would then radiate into the shop and cause you to use more energy to keep it up to 75 degrees, than had you installed insulation.
Now if you are choosing a crawl space, some of the same rules apply. There are new ideas about how to treat a crawl space. Since (if I remember correctly) the 1940s, building officials and contractors have been required to vent crawl spaces. The homeowner was to close the vents in the winter to prevent pipes from freezing and help stop heat loss through the floors, then open the vents in the summer to "dry out" the space. Time has shown this methodology to be completely flawed.
Especially in the humid areas of the U.S., opening the vents when the heating season was over has let warm, moist air get into our crawl spaces, creating mold problems and wood rot. Search "conditioned crawl spaces" and you can turn up way too many web pages on the subject. Just be sure to do your homework on the subject. Many of those pages are posted by someone wanting to sell you something. For information, stick to those that are for information only. Here are a few sites. Building Science.com, U.S. DOE, Pacific NW Labs & Advanced Energy.
Now, I live in a desert and moisture just isn't ever a problem. The reason for a conditioned crawlspace here is specifically to help prevent heat loss. Usually if you have heat, air conditioning, and a crawl, your duct work is run in the crawl space. Even if you insulate your duct work, a conditioned crawl space makes sense. The heat inside your ducts usually is anywhere between 87 to 105 degrees, in the heating season. If you condition your crawl space, the winter temperatures (with out heating the crawl) will be around 55 to 60 degrees. If the crawl isn't conditioned that can fall to the forties or below, even with the vents closed. The bigger difference between the temperature inside the ducts and the temperature outside, the more force behind the movement of heat.
I think this post is long enough. Let me know if I'm giving too much information or if you'd like me to cover other specific subjects, instead of the whole process of building a energy efficient shop. My next Green Shop post will cover the envelope.
 The plan called for two different contrasting woods. Wood magazine used maple and walnut. I priced the walnut and decided that staining my birch would do. I figure when I go to replace the birch slabs I used, this is still using at least $70 dollars worth of lumber, and that's not counting the kit. I got all the parts milled.
 Cut everything to size, did the glue-ups, beveled all the appropriate edges and finished sanded all the parts. I'm almost ready to start the finish.
  My plan is to dilute a polyurethane to make a wipe on finish.


